I love photographs.
Specifically, old, vintage photographs, but photos nonetheless. What’s more, I love when I get to take that great shot that has everything you could want in it, whether it’s part of my work as a journalist or in my personal time, when I see an osprey soaring above the farm or on a trip with my family or partner.
But I also love the feel of artwork — I’m probably not understanding the message behind the artist’s intent, but there’s just something about looking up at a gallery, taking it all in. It’s almost serene.
What if you can’t just walk to a downtown hub and check out a gallery?
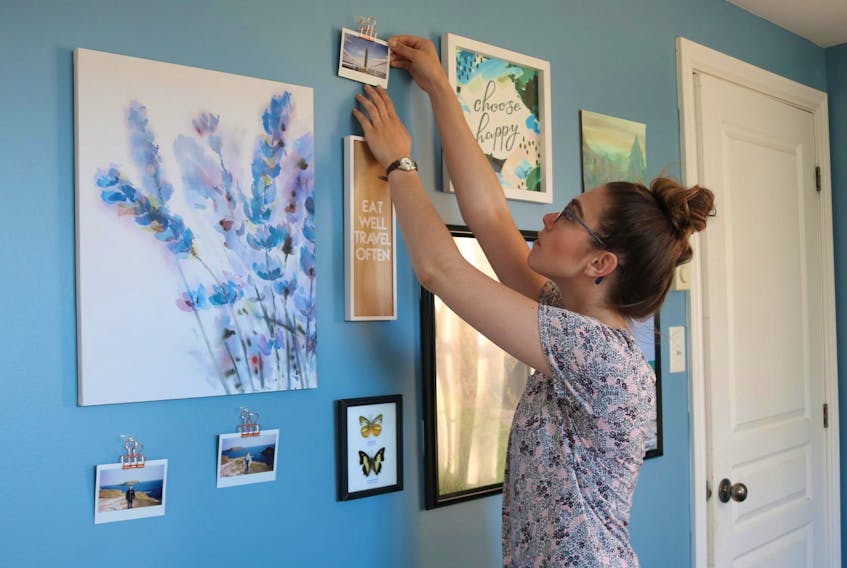
After some serious inspiration searching on Pinterest, I set up my very own galley wall in my home.
Arranging photos and art in a flattering way is not my day job, so when I starting trying different layouts, I took polls via Instagram stories. But there’s so much more that can be done to help shape those decisions.
Here’s what I’ve learned:
Like most everything else, do your research
I think I’ll be hard pressed to write a column where I don’t list this as one of the top three things to do. But in this case, research can be as simple as a Google search for “gallery wall layouts.” A collage of items will manifest, including diagrams with six, seven or eight different options in one place, making it super simple to save it for future reference.
Take a picture
If you see something that sparks inspiration (and this can go for anything, not just a gallery wall), snap a photo of it or save online images to a folder on your phone, computer or iPad. If you’re not super techy, draw it out free hand — which is what I did in my journal as I was brainstorming layouts.
Put your layout ideas to the test before you start securing things to your wall
This was crucial for me in finding a layout I liked. It actually came at the last minute when I was getting my mom to help me set up the wall. I used a giant roll of paper to trace outlines of each frame/item. Then I taped the to-size outlines of the items on my wall using painter’s tape. It didn’t damage the wall and allowed me to move the mock items around as much as I wanted until I found an arrangement I liked.
Be selective about your art/photos/gallery items
This was something I struggled with. I wanted the gallery wall completed and I wanted it completed right now!. But was expedience more important than the vibe and look I wanted from the wall? No.
I knew one item for sure I wanted to display was a photo from our walking tour of The Gobbins in Northern Ireland, which my family and partner did in April. So, I (not so) patiently waited as I had the photo enlarged to a 20x30 poster size. Then, I started to accumulate other things, like canvas art, picked out Polaroid photos from Ireland I knew I wanted displayed, found one of my old paintings that fit the hues of the other items and found ways to incorporate items I already had, like my butterflies in frames and some items I was gifted by my mom. While you want that eclectic, super cool gallery that only seems possible in a Hallmark movie, it’s important to remember to have pieces that tell the story you want.
Not interested in putting holes in your walls? Try command hooks/strips
This recommendation comes hot off the experience of my mom using these handy-dandy thing-a-ma-bobs. I used command strips, the poster ones and the Velcro ones that can hold up to nine pounds, to secure the various items to the wall. It was easy, peasy lemon squeezy. But, if you prefer to sure items by their built-in hooks, feel free to use nails or the actual command hooks.
Spacing is important
You don’t want the items on the wall to be too far apart or too close together. If they’re further apart, they won’t seem to flow together. And if they’re too close, it just looks crammed into a space and cluttered. Now, I’m not saying everything needs to be spaced the same distance apart, but try to find that happy medium (you’ll believe when you see it — literally). Use items of different shapes and sizes to create dimension and texture on the wall.

Now, there’s likely more I could share, but that would probably just be overwhelming (which is good for nothing). No matter what, friends, you’ll find a way to express yourself — through various prints you’ve ordered, photos you’ve taken and proudly display, or by just a solitary photo that speaks to you.
Good luck!
Millicent McKay is a Summerside-based journalist, columnist and blogger. She’s new to this interior decorating and making a house a home gig – but she’s a homebody determined to make every corner feel like… home! For more by her check out www.theonewithpaigeandmillee.squarespace.com and her Instagram page @modernmillee.